Monday 4 November 2013

Well Seasoned.

Joel, Anna and I met up with some other families at the Cambridge botanic Gardens recently.  We had been trying to time it right - the autumn colour has been late arriving this year, and with high winds, we ran the risk of there being no leaves at all.  And then there was the rain.....

But we picked the one perfect day. Azure blue sky, golden slanting sunshine and a wonderful setting.
Sadly, I realized there were no batteries in my camera when I arrived, but I caught a few nice impressions with the old phone.
Here are a few of the highlights:


Wednesday 30 October 2013

The Perils of British Bathrooms

Our life in Landbeach has been an eventful experience in home ownership.
Most of TAT's readers will be aware of the ongoing and multivarious sagas relating to things that go wrong with this house.
We are grateful to report that none of this has pertained to the significant fabric or construction of the house itself. But just about everything else has ....well....given us a wealth of learning opportunities, shall we say.

And none more than the bathrooms.
Showers that leak - but we have never found the source, baths that leak for months and only let you know when the wall is wet in the room next door....tiles that fall off the wall, shower thermostats that are welded to the cold setting....loos that don't flush, or constantly slightly flush.
Oh, and the times we could have sung 'Oh dear, what can the matter be? One of our guests is stuck in the lavatory....' (Only once had to get the local handyman to get them out though.....)

Then there is the decor aspect - those lovely coloured bathroom suits that were so popular in the 70s....candy pink, avocado green, Mother-in-Law beige, and then our own dearly beloved aquamarine.

But now, prepare yourself for the most fearsome bathroom peril of them all.....     
that autumnal nightmare....          
            The Spider in the Bath


yes, that is a standard sized penny....


Sadly this one ruined the poetic nature of such a peril by being in the sink instead.They can climb drains, but they can't scale shiny porcelain bowls.

I am too much of a nature lover to flush her down the plug hole; besides, she would have blocked the drain. So, here is the patent bug-eyed bath spider removal technique:
'Here we go again...'
The nature experts say that spiders, like mice, just turn right around once they've been ejected, and find their way back into the house. Who knows how many times I've already chucked this one out? If it is the same one, she's eating well, as she gets bigger every time!


Monday 28 October 2013

Apple Harvest

It has been an amazing Summer this year. With all the rain from last year making the foliage lush, and days of uninterrupted sunshine in late June and all of July, the apple harvest has been phenominal.
 Since we moved here two years ago, we have been systematically but conservatively pruning the overgrown fruit trees at the end of our very long garden.  We were not at all confident of the outcome....possibly reflected in the lone apple I put on this number plaque earlier in the year (Made at a potter friend's house)

The beehive is romanticised....perhaps one day Mark will make one for me like that.
However, our poor elderly Bramley trees were no exception to the national bounty.  Anna, Mark and I had a fun two hours picking them all.

Anna in her favourite habitat - up a tree.  I still need to prune for height, having done the untangling and removal of dead stuff the past two years.  I mean on the tree, of course....not Anna.

Mark kept a running total of weight - but we've forgotten what it all came to probably about 60lbs though.
 Sooty had fun pretending to be an apple. As Anna and Mark picked I chose the best ones to wrap up in newspaper for storage. I kept packing them around Sooty till he finally got the hint....
     
I blend in rather well, don't you think?

Even the little £3 Aldi Cox's Orange Pippin tree that I have had stuffed in a tomato pot for 3 years produced its first fruit - 18 lovely apples. And most delicious they were too.
Size was a little.....variable.
This year we need to hack back some of the overgrown shrubs around the 'Orchard' at the end to allow more light in to the trees.  I am hopeful that even the Victoria Plum will survive my ministrations and produce well next year - we had a few handfuls of scrumptious plams despite the tree looking most unhappy after a good haircut last autumn.

Friday 25 October 2013

Pork Pate - Vegetarians Look Away Now!

I've often said that if I really knew what went into pate it wouldn't eat it.
Well, now I have made it from first principles and its yummy.
We picked up our half a happy pig from Hempsal's Farm last week. This time I was spared no realities - we got the lot. Head, bones (extracted), feet.....
The rest of the family stayed totally clear of the kitchen while all this was going on.....
And here is why:

Liver, trotters and half a head: the cheek is the best meat...though not much of it.
What to do with half a pig's head?

I reasearched a little here and there....considered boiling the head as for brawn (Head cheese to US readers - sounds a bit like toe cheese to me....) Somehow, having a head in the pot and watching the gums recede as it boiled did not appeal. Settled on using the meat for a variant on Delia Smith's Coarse Country Pate.


The first job was to remove the meat from its various hiding places.
So I whipped out my nice sharp Sabatier and investigated. I left the brain alone - it was a lot smaller than I expected.
The teeth could have done with better brushing and flossing - another reason to avoid boiling the whole head.

I did boil the trotters because the meat was encapsulated in very tough connective tissue. Also, it made AMAZING stock.  Would you believe that from 6 trotters (Not bad when I had only bought for only half a pig....) this was all the meat I could find:

Apparently trotter meat is delicious.
I had about 600g of liver, a few micrograms of trotter meat (!), about 400g head meat, so I added 400g unsmoked streaky bacon and a chunk of unspecified weight from the belly.
Blend it all up with 3 cloves of garlic, 20 juniper berries crushed, 20 black pepper corns crushed, and a dollop of trotter stock.
I pressed it into a loaf pan and some ramekins and baked them in a bain marie at low heat for 1.5 hours.
Out of the oven, covered with foil, and weighted down with whatever I had to hand that was heavy....tomato cans, pestle and mortar, bookstand etc.

And here is the result:
I have sliced this up and frozen it now.
One member of the family couldn't wait to try the pate, so he jumped on the counter when no one was looking, knocked the weight off one of the ramekins, clawed back the foil and helped himself. I hope he had indigestion from all that pate - his breath was certainly rather garlicky, hence we identified the culprit after the event.
Who me?

We agree with him though - it was quite delicious on crusty bread with a cornichon.  Garlic breath all round.

Wednesday 2 October 2013

Winter feeding

The gurus said it was time to feed bees; especially new colonies that have not had long to build up their own stores for the winter.
So, I dutifully followed instructions, and fed them.

I was somewhat amazed to think that the jerry can of 'Invert sugar' syrup I had bought would all fit into one hive, but that's what them-in-the-know had said, so off I went to do the deed.
14 litre jerry can of syrup.

There are winter syrup feeders available to buy at vast expense (Can't use the type I had used during the summer because this syrup is too thick and sticky for the bees to suck through the tiny mesh of the bucket feeder.) But the experts said they always used 4 standard British rectangular plastic ice cream tubs placed inside an empty super directly on the brood frames - no queen excluder.

SO, I took four nice blue Walls ice cream tubs and filled them each with syrup.
The experts also said that bees drown if they have nothing to stand on, and so to place a nice wad of straw to float on each tub of syrup.  Straw floats......check!
Here are the feed tubs full of syrup ready to be placed in the hive.
Those self same experts said it would only take 2 to 3 days for the bees to suck that lot up and need the rest of the can pouring in to top them up, so off I trotted a few days later but.....HORROR!
I found each tub with half the syrup still in place and a crust of drowned sticky bees on each one!

Sorry, no photos- things got a little too sticky for camera.
My straw wads were not big enough. The bees had landed on them, and with the weight of them all, they had sunk!  I must have lost 100 to 200 bees. Not too awful in a hive of thousands, but it was a sorry sight.

I scraped them all off, refilled the tubs and this time, shoved enough straw in that it could not be flattened - more like a straw scaffold than a float.
Straw scaffold - mostly dead and dried cow parsley stalks this time. No namby pamby dried grass!
Another check in 4 days, and the syrup was all gone. The straw and tubs were not even sticky! And there were no drowned beese. just a bunch of very full frames underneath.

So, back to business. Normally, it wouold be a question of closing the hive up and leaving it there for the winter, but we have an added variable: ivy. Lots and lots of ivy. Bees love the stuff, and it has only just begun to flower. My babies are flying back and forth with loaded paniers of pollen, and stomachs full of nectar.
With the brood box full of syrup for the winter, time to add my super again, in the hope of a late season harvest of ivy honey.
I don't feel bad about fobbing bees off with syrup while I extract the good stuff. Ivy honey sets like rock after a few weeks, and the bees can't use it during the winter anyway - at least not unless the weather is good enough to allow them to fly out for water regularly.
Guess what the next bee post will be about????

Sunday 29 September 2013

Liquid Gold

I have honey!
Only 2.5 jars of it, but it is the best tasting honey ever - not that I am biased.
I am a month late posting this, and much has happened since our exciting and sticky extraction experience, but getting the goods is the most fun part, so the rest can wait a while.
The finished product - beautiful dark and delicious.

 Note the jar to the left says 'Nectar'?
I learned on the course that uncapped honey can't be called honey. It has to be called nectar, because the bees will only put a wax cap over it if it has evapourated enough water from the cells to be of a concentration that will not allow the honey to ferment. The second of the two batches of frames we extracted was mostly uncapped, but it kept beautifully all the same and tasted like honey to me!
I say it kept - of course we ate it within 3 weeks, so that wasn't much of a test, was it?


Close up of the 1/2 jar, which contained a chunk of comb for reasons that will become apparent shortly...   


here's how it happened:

In mid-august I attended a top up class where the experts imparted their know-how on helping a new colony to survive its first winter.  Very informative it was too.
Plan was: remove any honey-containing 'supers' then treat the bees for Varroa mite immediately. This means two sets of two week treatments, so the hive is a no go area for that month, any honey collected during that time can't be eaten by humans.

To my utter delight, there were four frames nearly full of honey/nectar, two of them mostly capped, two partly capped.

First job is to remove the 'cappings'; a thin layer of wax that the bees cover each cell with once it has reached the correct concentration of sugars. I used a bread knife. Most of this frame is uncapped, but you have to remove the top part of the cells anyway to couteract capillary action. Sorry, getting a little technical here...


Once uncapped we attached two frames at a time to Mark's rapidly engineered home made extractor.
This is effectively a slow spin centrifuge comprising a large polythene bucket, a long threaded steel rod, a couple of metal plates, some screws and....a drill and an index finger (!) to make the motor!!

All went well to begin with, the honey began to splatter against the sides of the bucket. We were amazed at how much there was in there, but there was still so much left in the comb. So Mark decided to press the trigger a little harder, and oops! a slight wobble of the hand, with the result as below:
Splat! The big holes in the honey comb and the splattered wax on the sides are not meant to be there!
 
Much hilarity ensued. We decided to cut our losses - literally - by cutting out the remaining comb and (ahem, horror on faces of food hygenists...) I squeezed the honey out of the bits that had flown out during extraction.
It was a very sticky experience. I washed the floor and counter tops (And a few cupboard faces) down twice afterwards, but the cat still had honey on his tail the next morning!

Next year I will borrow a commercial honey extractor for the 22 frames that I hope to have filled. This year, it was just so much fun to do it ourselves!


Sunday 21 July 2013

First Hive Inspection Report

At last! I have been treated to a glimpse into inner the world of my bees!


 Serious achievement: lighting my smoker all by myself!! 
Starting with a little soft cardboard from an egg box...
Add some bone dry rotted wood 

Pack it in nice and tighly and flip on the lid.
puff the bellows a few times to keep it all alight, and it was ready to go.


 A little smoke in the hive entrance tells the bees "There may be a fire nearby - gorge yourself on nectar in case we have to evacuate."
Once full of honey, the bees are conditioned not to sting:  stinging means death to a bee. Death for a full bee means a stomach full of honey lost for the colony. If you look at the pics below, you'll see a number of bees with their heads shoved in a cell - they are sucking up as much nectar as they can at that moment. 


The lid is off - I had a few lumps of rogue comb to remove from the tops of the frames, then...


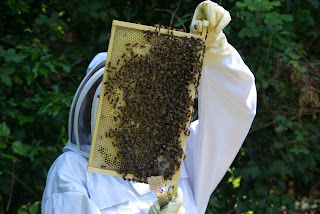
lift out a frame to see what is going on. Just a few bees on there huh?
As I suspected, my resident ladies have been extremely busy.
In just two weeks they had pulled out the wax to make comb on about 80% of the brood frames, and the queen had clearly been hard at work laying - I had the full compliment of brood:  eggs, larvae in different stages of growth - all pearly white and curled up in their snug little cells - and capped larvae, pupating into bees behind a wax door.
All good healthy signs to see.

You need good eye sight for this, but if you look in the cells to the right of the bottom two bees, there are tiny little white commas. They look a bit like shine marks, but they are eggs. The amber liquid is stored nectar. The bees wait until most of the water evaporates from it before capping it. Only then is it honey.


At least 5 frames had brood laid in them, all showing a lovely classic pattern - an oval of eggs/larvae/capped larvae in the middle, pollen in an arc above that, and nectar or capped honey in the top corners.
Another good sign is that all the capped larval cells were for worker bees. No drones larvae means no one is planning on a mating flight, which means the colony is not planning to swarm again....phew.
The palest coloured open cells contain juicy fat larvae. The wax capped cells have pupating bees in them. All workers - nice flat wax caps.

Several frames at either end of the brood box were being drawn out and filled all over with nectar for food stores.
There were two frames at one end that had not been touched.  Bees tend to lay symmetrically starting in the middle of a brood box and working out evenly on each side.  I'll keep an eye on that. I might have to move my empty frames to be included in the symmetrical pattern so that they don't become wasted space.

Joy of joys! I saw the her majesty herself, calmly wondering around on a frame, attended by some workers, with plenty of tiny freshly laid eggs in evidence.
The queen is hard to spot for a beginner, so I was thrilled to see her. She is about 1/4 inch longer in the abdomen than the workers.
So, the bees are healthy and busy.
My biggest concern is to make sure there is plenty of space. Since they came as a swarm, they would not think twice to swarm again if I let them get cramped.
A quick reference back to my bee books and notes from my classes confirmed my hunch - time to get my first super in place. Perhaps having more space to store only honey will free up some of the brood frames for the queen to lay in.